Showing posts with label Sensory Play. Show all posts

Wednesday, October 30, 2013

Halloween Sensory Box

The last post in our Halloween series before the day itself is upon us, and of course I just had to make it a sensory box! :-) This one is suitable to engage children 6 months - 3 years old, and takes the form of a Halloween treasure hunt for little toys buried in the lentils. Lentils are a lovely sensory material, they feel so wonderful running through your fingers, pour beautifully, and have the perfect Halloween themed colours! They're also completely safe for infants still in the oral phase.

For this activity you will need:

  • Large plastic tub
  • 4 bags orange lentils
  • 1 bag black lentils (french lentils)
  • Assorted Halloween toys (from dollar store)
  • Scoops, cups, cardboard tubes
  • Drop cloth
The set up is super quick...first pour all the lentils into the tub....


...and mix them together (Don't they look wonderful?)...


...Then get your treasures ready...


...These are the ones I chose to use...


...Now hide some of the treasures beneath the lentils, and use some for decoration...


...and your done! :-)


When Bean and I sat down to explore the box, she took her time exploring all the different items one by one as she uncovered them...


...She enjoyed pouring into the tubes and cups...


...but most of all she loved pouring on herself! (hence the drop cloth)


Once almost all the lentils were scattered and piled on the drop cloth, we told lots stories with the characters from the box (currently one of Bean's favorite kinds of play).


All in all it was a great way to start our Halloween celebrations and to introduce some more Halloween themed characters and toys for story telling and imaginative play. 
I hope you've enjoyed our Halloween series and had fun with some Halloween play yourselves. Now all that's left for us to do is get our costumes and treats ready for the big day tomorrow...

Happy Playing & Happy Halloween! 


Monday, October 7, 2013

Strawberry Mush!

Making a variation on silly putty has been on my mental "Things To Try" list for the longest time. We tried once using a recipe that combined white glue and starch, but it was a total fail, and since then i've been on the look out for a different one. This recipe is SO easy to make and all the ingredients are completely safe for even young toddlers to handle, and it makes a wonderful scented play material!

Here's the recipe:

2 cups corn flour (corn starch if you're in the US)
1/2 cup Shampoo (the cheap chemical stuff - NOT the all natural stuff)
4 tbls water
Food colouring
Glitter (optional)


Bean of course helped in the making process (which for her is just as important as playing with the end product), so I measured out the ingredients and she poured, spooned, and stirred...First the shampoo...


...Then the corn flour...


...a few drops of food colouring...


...GLITTER. Because pretty much everything is better with glitter...


...and there we have it! Bean has named it strawberry mush because of its fruity smell and delicious pink colour.


I was really curious to see how this material would act when played with, and I was really happy with the results. It feels basically like the silly putty you can buy from the shops, but slightly firmer and not as sticky. We were both pretty fascinated by the stuff and had fun finding out its properties...


...It's lovely to shmush and holds a print for a minute before expanding back up...


...when its rolled into a ball it gradually melts to flat and is lovely and shiny...


...it can get a bit stuck to surfaces after it has melted onto them, so I might try lightly oiling the table before we play next time...


...and it's very, VERY stretchy!...


Bean got out some of our playdough tools and started poking holes, digging around, and rolling it into sausages to cut with a plastic knife...


..."Would you like some strawberry mush ice cream mummy?"...


...Then she made a batch of mushy birthday cupcakes!...


...YUM!


This was a seriously fun sensory material to make and play with, and Bean revisited it numerous times over the next few days. 

A few notes from our experience:
We found that when left out or played with for an extended period it starts to dry out a bit, so when this happens you just need to add another couple tablespoons of water and knead it again to get the smoothness back. It's also necessary to store in an airtight container or zip lock bag when not in use as once it dries out completely it's very hard to get it back to the right consistency. It's also quite messy, leaving residue on surfaces, clothes, hands, bits on floor etc, but cleans up very easily (being soap based it's actually quite fun to wash off because it gets a good lather going!).

We'll definitely be adding this to our list of regular play materials, and really hope you try it to!

Happy Playing!


Monday, September 23, 2013

Sea Treasure - Sensory Box

I have to give the credit for this activity in large part to my husband, who accidentally invented the main material used in its making! You're probably wondering "what on earth are those blue things?"...Well, Bean has named them 'Curly Whirlies', and they're actually the debris from when my husband was drilling holes in some big plastic barrels for planting. They're all sprially and some of them are very springy, Bean found them fascinating so I just had to use them in some way!


We haven't done so many sensory activities over the winter, mostly due to the mess factor as we usually do this kind of play outside. But the weather is warming up and it seemed a good opportunity to get stuck back in with a sea themed sensory box! 

This sensory box is one with a twist, as well as being a sensory activity it's also a treasure hunt game. Hidden beneath the curly whirlies are little glass gems shaped in sea themes such as shell, sea horse, star fish, and I included a small pot to gather the treasure in. 


The materials used are as follows:

  • Curly whirlies (you could also use blue aquarium rocks or anything else blue that can get wet)
  • Aquarium plants (borrowed from our under the sea playset)
  • Plastic boats (borrowed from our water table)
  • Plastic anchors (found at op shop)
  • Duplo people
  • Jar or small container
  • Sea gems (found at dollar shop) 
I set this up one night for Bean to play with the following day, and it was very well recieved! I think as much as anything she was just so happy to get back in to sensory play outside, which was a big highlight of last summer. 


She started off with some imaginative story telling using the people in the boats, and was interested to have me explain and demonstrate what the anchors were.


I has already anticipated that she would want to add water to this tub, because I mean...who wouldn't? And of course after a little while she went to get the hose. She enjoyed swirling the water around with the curly whirlies in it, it felt wonderful...and it was then that she discovered the treasures hiding underneath!


Well, needless to say we did a LOT of treasure hunting that day (and the next)! When she was losing interest in finding treasure in the tub, we added the gems to our sand pit and dug for buried treasure in the sand. 

All in all this was a lovely box to play with and a really nice start back into using our outdoor space again :-) Roll on summer! 

Happy Playing! 


Wednesday, September 18, 2013

5 Activities With Rainbow Pasta

This is something I've been thinking of making for a while, but kept putting off in favor of other things. But today I was out of other ideas and so I finally made it! I realized afterwards that its actually a really versatile ingredient for a number of different activities, plus It's so simple to make and looks lovely and bright.

How to make Rainbow Pasta: 

You will need -


Dry pasta of different shapes
Food coloring 
Rubbing Alcohol (Isocol - available from pharmacies)
Zip lock bags 
Baking paper and baking trays

First put about a tablespoon of the alcohol into a zip lock bag, and add some food coloring (I used around a teaspoon).


Then add the dry pasta, close up the bag, and then massage the bag until all the pasta is covered in colour. 


Repeat this process with as many colours as you like, I made 5 colours total  - red, pink, blue, green, and yellow. 


Then put baking paper on some trays and tip the pasta out onto them, spreading it out to a single layer for drying.


Leave to dry. Now, the time it takes to dry completely is really variable depending on heat/cold etc. Its spring here and happened to be a sunny day when I did this so I popped the trays in the sunroom to dry and it only took about and hour. If you're in winter and you don't have a warm place to dry the pasta, consider making it in the evening and leaving to dry overnight.


When its dry you're ready to play! You can either choose to mix up the colours in a big tub, or keep them separate in smaller containers or a segmented container - the choice is yours! I chose to mix them together and I think the result is beautifully vibrant. 


So now you've made your pasta what are you going to do with it?? Well, here's a few ways to get you started: 

1. Threading (2 years +)

Threading is a great activity for practising co-ordination and dexterity, as well as being creative and fun with a wearable finished product!


For this activity I took a bunch of ribbons from one of our craft boxes and some kitchen string, at one end I tied a knot to hold the pasta on and threaded one pasta onto each one to get things started.


I also decided to wrap some sticky tape around the ends of each string/ribbon to make the threading a bit easier for Bean, who still finds this task quite tricky.


I set up this invitation to play on the light panel on the floor of our playroom, as I thought the added light element would be nice coming through the coloured pasta.


Bean came to play after her nap, and it ended up being a nice gentle waking up activity for her.


We even had our two little neighbours from across the road come and enjoy this one too, and being older children they made some wonderful necklaces, one of which they gave to Bean who has been wearing it every day since! :-)


2. Play dough prints and pictures (1 year +)

After Bean had finished with threading she requested to make animal shapes with the pasta on the light panel. However, the pasta kept moving about and Bean was getting frustrated so I got out some play dough!


Bean decided to make Dinosaur so this is our pasta-o-saurus! ROAR!


3. Making pictures (2 years +)

The next day we used the pasta to make 3D pictures, using PVA glue (also called school glue or white glue), coloured paper, coloured pens, and glitter...


At 2.5 Bean was able to do this activity all herself with me merely a spectator, and it's always so lovely to see the glow of her independently creating...


...Gluing...


...Sticking...


...making it sparkle!


With some coloured pen added for a finishing touch it turned out beautifully.


Then when she had finished her own picture she asked me if I would like to make one together - naturally I accepted the invitation ;-)


So we made...a rainbow! 


4. Colour Sorting Game (1 year +) 

This is a simple way to use the pasta for colour sorting/matching, which would be a great skill and colour activity for younger toddlers.


I set this one up for Bean after she went to bed one night ready for her to find the next morning, using a basket filled with the rainbow pasta, and clear jars with spots of coloured paper underneath (which I cut out from A4 sheets) that corresponded with the colours of the pasta.


For a half asleep Bean this was an easy activity, because of course by now she already knows her colours inside out.


So after a bit of sorting and matching, the game progressed into something much more fun for her! First she began to fill the jars up with "all colours of the rainbow mama!" trying to squeeze as much pasta into each jar as she possibly could.


She then took the coloured spots from underneath the jars and declared that they were lily-pads for a pond and we were all frogs! So we cut out a few more 'lily-pads' and played a hopping frog game around the lounge!


It just goes to show that when you set up a play activity you never know where it might lead, and in my experience the best fun often happens in ways that were never planned.

5. Rainbow Shakers (6 months +)

The final idea is one that would be perfect for all the very little people, although the bigger ones can enjoy it too! Infants love exploring sounds and colours, so why not combine the two elements and make some rainbow pasta shakers?


It takes away the choking hazard of the small pasta bits, whilst still allowing them to absorb the rainbow colours and different shapes, and make sounds as well. I used two different size plastic containers to make different tones, in the larger container I put a handful of all the pasta shapes mixed together, and in the smaller container I picked out just the smaller pasta shapes. 


Bean loves to do percussion along with music so these were a nice addition to our daily dancing session!

Hopefully I've given you some inspiration to try making some Rainbow Pasta at home! There are SO many things you can do with this one simple material, some other ideas I had are:

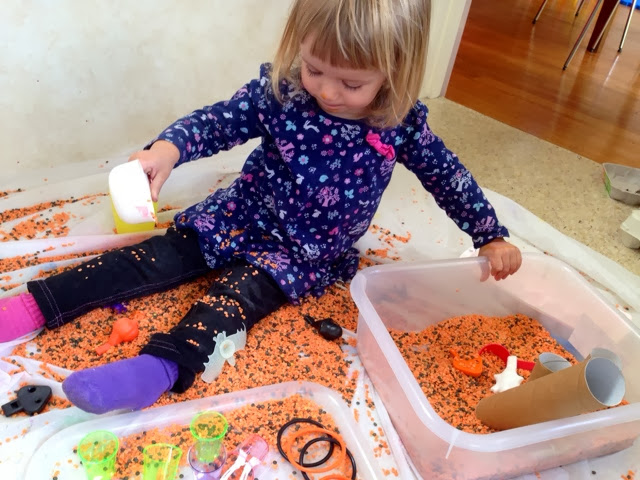
  • Pasta Sensory Tub - for 1 year +, using bigger pasta shapes, and including some containers and spoons for scooping and filling.
  • Pasta Treasure Hunt - for 18 months +, using a full tub of pasta with small 'treasure' items hidden within it. 

Happy Playing!