Wednesday, October 30, 2013

Halloween Sensory Box

The last post in our Halloween series before the day itself is upon us, and of course I just had to make it a sensory box! :-) This one is suitable to engage children 6 months - 3 years old, and takes the form of a Halloween treasure hunt for little toys buried in the lentils. Lentils are a lovely sensory material, they feel so wonderful running through your fingers, pour beautifully, and have the perfect Halloween themed colours! They're also completely safe for infants still in the oral phase.

For this activity you will need:

  • Large plastic tub
  • 4 bags orange lentils
  • 1 bag black lentils (french lentils)
  • Assorted Halloween toys (from dollar store)
  • Scoops, cups, cardboard tubes
  • Drop cloth
The set up is super quick...first pour all the lentils into the tub....


...and mix them together (Don't they look wonderful?)...


...Then get your treasures ready...


...These are the ones I chose to use...


...Now hide some of the treasures beneath the lentils, and use some for decoration...


...and your done! :-)


When Bean and I sat down to explore the box, she took her time exploring all the different items one by one as she uncovered them...


...She enjoyed pouring into the tubes and cups...


...but most of all she loved pouring on herself! (hence the drop cloth)


Once almost all the lentils were scattered and piled on the drop cloth, we told lots stories with the characters from the box (currently one of Bean's favorite kinds of play).


All in all it was a great way to start our Halloween celebrations and to introduce some more Halloween themed characters and toys for story telling and imaginative play. 
I hope you've enjoyed our Halloween series and had fun with some Halloween play yourselves. Now all that's left for us to do is get our costumes and treats ready for the big day tomorrow...

Happy Playing & Happy Halloween! 


Saturday, October 26, 2013

Paper Plate Monsters!

I have to say that this is one of the most Bean-approved crafts we've done in quite some time. At 2.5 years she's all about doing everything by herself, and so in preparing our next Halloween craft I wanted to make sure she could do ALL of the steps totally by herself. Granted, this approach does mean extra thought and preparation time, but as far as i'm concerned it was absolutely worthwhile!


To make some silly and scary Paper Plate Monsters, you will need:
  • Paper plates
  • Poster paint
  • Paint brushes
  • Coloured craft foam sheets
  • Scissors
  • Black Sharpie
  • PVA glue


So, in terms of preparation the main thing to do once you've gathered all the bits and pieces is to take the foam sheets and cut out some sets of different monster-ish facial features and then draw in the details using a black sharpie pen. I intended to make three sets of eyes, nose, mouth, and eyebrows (although I somehow ended up with an extra pair of eyes!) that Bean could then mix and match to make three different monster faces - but of course you can do as many as you like! I also pre-mixed the paint into some shades I thought would look effective and mix together well as Bean likes to use all colours on everything!


Once it was all ready to go I put all the bits together in a box up on top of our art shelves and waited for an opportune moment to show it to Bean...And I didn't need to wait long!


First the painting!


Then leave to dry...and perhaps have a snack!


Once the plates are dry then the real fun begins!


Bean loved pouring the gloopy glue...


...and then selecting the features to use for each Monster face (ironically she chose to use one colour of features for each face)...


...leave the glue to dry...


...and there you have it! Scary silly monster faces perfect for Halloween decorations, story telling, and games of 'Monster Chasey' ;-)

Happy Playing!

Monday, October 21, 2013

Spooky Tube People

This spontaneous Halloween activity was invented on the spot one day when Bean took out the black paint and some tubes and began to paint. "What can we make with this Mama?"...ummmmmmmmmm...I know - Spooky tube people!


These are easy peasy for little hands to make, and make great props for story telling play. To make you will need:

Black poster paint
Paint brush
Cardboard tubes (from toilet rolls)
Google eyes
PVA glue
Glue stick 
Pipe cleaners 
Scissors
Coloured paper
Sticky tape

First paint the tubes with a good coat of black poster paint and leave to dry. 


Use PVA glue to stick on google eyes, cut mouth shapes out of Coloured paper and glue in place to complete the face. 


Cut some pipe cleaners in half, and use a strip of sticky tape to attach to the inside of the tube above the face to create the hair. 


Once the glue is all dry you're ready to play! We told lots of stories with our new characters, mixed in with other people and animals from beans collection.


I find children love any activity which involves making something that they can then use in play, because it gives the project an extra sense of fulfillment for them, which is always a joy to see. 

Happy Playing! 


Thursday, October 17, 2013

Halloween Egg Carton Bats

I'm always happy to discover new uses for egg cartons! They're such a versatile craft material and we have SO many of them constantly piling up in our cardboard cupboard. So for our next Halloween themed craft we made some cute hanging egg carton bats!


For this you will need...

Egg carton
Scissors
Black paint
Paintbrush
Black paper
Google eyes
PVA glue
Black string/wool/ribbon
Plastic beads

The 'How To'...

Use scissors or cut the egg carton into two lots of three egg cups. Trim the excess and cut fang shapes into the middle cup in each bat.


Paint the bats with black paint until completely covered, then leave to dry.


Cut two sets of bat ears from black paper and use PVA glue to attach each pair of ears to the top of the bats head. 


Glue the google eyes in place, then leave to dry again. 


Finally use scissors or a skewer to punch a hole in the top of the bats head behind the ears. Then thread a length of string, wool, or ribbon through the hole and secure by tying the inside end around a plastic bead.


The finished bats look scary in a delightfully cute way! Bean was ecstatic with her "Bouncy Bats" (the name she came up with for them), and although I had originally intended them as decorations for the kitchen it wasn't until the following day that she allowed me to hang them up!


She had great fun flying them around, telling stories, and playing scary chasey games...definitely a success!


Happy Playing! :-)

Wednesday, October 16, 2013

Sticky Window Pumpkin

I'm really excited about this post because it's the very first Halloween craft Bean and I have ever done! Last year she was a bit too small to do much in the way of crafting, and me being born in Britain and never celebrating Halloween growing up it took me a while to catch on! So, anyhow, I'm super excited to present the first in our series of Halloween themed activities for the month of October - sticky window pumpkins!


This is so simple and perfect for children age 1-3. All you need is...
  • Contact paper
  • Masking tape
  • Orange tissue paper 
  • Black paper 
  • Scissors
  • Black marker pen 


To prepare this invitation to play I cut a large piece of contact paper and used a black Sharpie marker to draw a pumpkin outline onto the clear side. I then stuck it to the window, sticky side out, with masking tape. Last of all I ripped up two tones of orange tissue paper into small pieces, and cut a jack-o-lantern eyes, nose, eyebrows, and mouth out of black paper.


Bean was excited to do this activity. She's just learning about all things Halloween and is totally fascinated by the concept! She placed the facial features and we filled in the orange colour together.


It didn't take long but it makes a stunning window decoration and has a wonderful warm glow when the sun shines through.


We have lots more Halloween fun to come - so stay tuned!

Happy Playing! 


Friday, October 11, 2013

Fairy Wands

This was a really simple fun craft for little ones who love the world fairies. I stumbled across some plain wooden wands on a recent trip to the craft shop and set them up to be decorated that afternoon.

You will need:


  • Wands (if you can't find pre-made ones you could always make your own!)
  • Paint and brushes
  • glitter 
  • Sequins
  • Gems
  • PVA glue

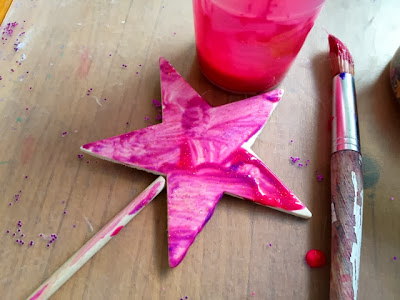
First we painted the wands with poster paint...


Leaving them to dry while we went to do something else...


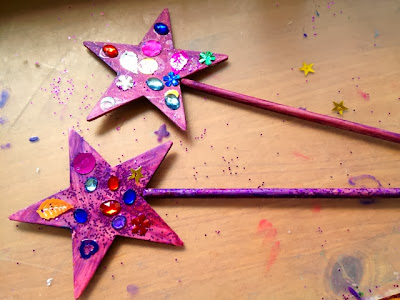
Then we squeezed some splodges of PVA glue onto the wands and added sequins, gems, and a good sprinkling a glitter! 


Leave to dry again and hey presto! Beautiful sparkly fairy wands perfect for dressing up, imaginary play, and story telling! :-)

I also plan to give these a coat of Mod Podge to protect them and give them an extra sheen, or you could also use a coat of slightly watered down PVA glue for basically the same effect. 

Happy playing! 


Monday, October 7, 2013

Strawberry Mush!

Making a variation on silly putty has been on my mental "Things To Try" list for the longest time. We tried once using a recipe that combined white glue and starch, but it was a total fail, and since then i've been on the look out for a different one. This recipe is SO easy to make and all the ingredients are completely safe for even young toddlers to handle, and it makes a wonderful scented play material!

Here's the recipe:

2 cups corn flour (corn starch if you're in the US)
1/2 cup Shampoo (the cheap chemical stuff - NOT the all natural stuff)
4 tbls water
Food colouring
Glitter (optional)


Bean of course helped in the making process (which for her is just as important as playing with the end product), so I measured out the ingredients and she poured, spooned, and stirred...First the shampoo...


...Then the corn flour...


...a few drops of food colouring...


...GLITTER. Because pretty much everything is better with glitter...


...and there we have it! Bean has named it strawberry mush because of its fruity smell and delicious pink colour.


I was really curious to see how this material would act when played with, and I was really happy with the results. It feels basically like the silly putty you can buy from the shops, but slightly firmer and not as sticky. We were both pretty fascinated by the stuff and had fun finding out its properties...


...It's lovely to shmush and holds a print for a minute before expanding back up...


...when its rolled into a ball it gradually melts to flat and is lovely and shiny...


...it can get a bit stuck to surfaces after it has melted onto them, so I might try lightly oiling the table before we play next time...


...and it's very, VERY stretchy!...


Bean got out some of our playdough tools and started poking holes, digging around, and rolling it into sausages to cut with a plastic knife...


..."Would you like some strawberry mush ice cream mummy?"...


...Then she made a batch of mushy birthday cupcakes!...


...YUM!


This was a seriously fun sensory material to make and play with, and Bean revisited it numerous times over the next few days. 

A few notes from our experience:
We found that when left out or played with for an extended period it starts to dry out a bit, so when this happens you just need to add another couple tablespoons of water and knead it again to get the smoothness back. It's also necessary to store in an airtight container or zip lock bag when not in use as once it dries out completely it's very hard to get it back to the right consistency. It's also quite messy, leaving residue on surfaces, clothes, hands, bits on floor etc, but cleans up very easily (being soap based it's actually quite fun to wash off because it gets a good lather going!).

We'll definitely be adding this to our list of regular play materials, and really hope you try it to!

Happy Playing!