Friday, October 11, 2013

Fairy Wands

This was a really simple fun craft for little ones who love the world fairies. I stumbled across some plain wooden wands on a recent trip to the craft shop and set them up to be decorated that afternoon.

You will need:


  • Wands (if you can't find pre-made ones you could always make your own!)
  • Paint and brushes
  • glitter 
  • Sequins
  • Gems
  • PVA glue

First we painted the wands with poster paint...


Leaving them to dry while we went to do something else...


Then we squeezed some splodges of PVA glue onto the wands and added sequins, gems, and a good sprinkling a glitter! 


Leave to dry again and hey presto! Beautiful sparkly fairy wands perfect for dressing up, imaginary play, and story telling! :-)

I also plan to give these a coat of Mod Podge to protect them and give them an extra sheen, or you could also use a coat of slightly watered down PVA glue for basically the same effect. 

Happy playing! 


Monday, October 7, 2013

Strawberry Mush!

Making a variation on silly putty has been on my mental "Things To Try" list for the longest time. We tried once using a recipe that combined white glue and starch, but it was a total fail, and since then i've been on the look out for a different one. This recipe is SO easy to make and all the ingredients are completely safe for even young toddlers to handle, and it makes a wonderful scented play material!

Here's the recipe:

2 cups corn flour (corn starch if you're in the US)
1/2 cup Shampoo (the cheap chemical stuff - NOT the all natural stuff)
4 tbls water
Food colouring
Glitter (optional)


Bean of course helped in the making process (which for her is just as important as playing with the end product), so I measured out the ingredients and she poured, spooned, and stirred...First the shampoo...


...Then the corn flour...


...a few drops of food colouring...


...GLITTER. Because pretty much everything is better with glitter...


...and there we have it! Bean has named it strawberry mush because of its fruity smell and delicious pink colour.


I was really curious to see how this material would act when played with, and I was really happy with the results. It feels basically like the silly putty you can buy from the shops, but slightly firmer and not as sticky. We were both pretty fascinated by the stuff and had fun finding out its properties...


...It's lovely to shmush and holds a print for a minute before expanding back up...


...when its rolled into a ball it gradually melts to flat and is lovely and shiny...


...it can get a bit stuck to surfaces after it has melted onto them, so I might try lightly oiling the table before we play next time...


...and it's very, VERY stretchy!...


Bean got out some of our playdough tools and started poking holes, digging around, and rolling it into sausages to cut with a plastic knife...


..."Would you like some strawberry mush ice cream mummy?"...


...Then she made a batch of mushy birthday cupcakes!...


...YUM!


This was a seriously fun sensory material to make and play with, and Bean revisited it numerous times over the next few days. 

A few notes from our experience:
We found that when left out or played with for an extended period it starts to dry out a bit, so when this happens you just need to add another couple tablespoons of water and knead it again to get the smoothness back. It's also necessary to store in an airtight container or zip lock bag when not in use as once it dries out completely it's very hard to get it back to the right consistency. It's also quite messy, leaving residue on surfaces, clothes, hands, bits on floor etc, but cleans up very easily (being soap based it's actually quite fun to wash off because it gets a good lather going!).

We'll definitely be adding this to our list of regular play materials, and really hope you try it to!

Happy Playing!


Friday, October 4, 2013

Dinosaur Wash

I love it when Bean and I come up with a completely spontaneous activity together.  It can be something so simple but there is such a joy that shines when children invent their own activities that it often absorbs them more completely than any pre-planned ideas you the adult might have had. Bean is seriously into Dinosaurs, and also LOVES any kind of water play. One afternoon whilst we were telling a story with her dinosaur play set, the dinosaurs had been "jumping in muddy puddles" and Bean decided they all needed a bath...So we set up a Dino-Wash!


The key here was allowing Bean to take the lead in initiating and setting up the activity, helping her find something to use as a bath, giving her a plastic jug and step up to the tap so she could fill the bath herself, getting her to squirt in some bubble bath, and going on a hunt around the house to find various scrubbers and sponges we could use for washing.


I find these days that the process of setting up the play area (whatever it is she might want to do) is as important as the play itself for Bean. I also find if she's actively involved in setting up she readily helps with putting away once the activity is over.


With a squirt of bubbles and some warm water away she went giving her dinosaurs a thorough clean! 


Of course a LOT of water ended up on the floor, which is why I chose to do this in the bathroom with some towels down. 

It was simple clean fun, good for sensory, motor, and role play, and it doesn't have to be dinosaurs of course...plastic animals, dolls, little people, my little ponies, or even give them some plastic plates and cutlery for 'washing up'. Every kid likes bubbles and water so you can't really go wrong!

Happy playing!

Thursday, October 3, 2013

Dinosaur Jungle

We've had a wooden box full of dirt sitting in the corner of our patio play area for months now, and every so often I look at it and think "I must do something with that...". Sometimes it's just been used for digging for bugs or the occasional mud pie, but mostly it's just sat there looking a rather shabby...until now!


I've been seeing a lots of ideas for outside small worlds on Pinterest lately (yes, I do ocassionally get lost in Pinterest land) and also wanting to find a more permanent home for Beans dinosaurs, so one sunny afternoon we turned our box of dirt into a Dinosaur Jungle! 


Together Bean and I gathered small branches from bushes and trees around the garden and pushed them into the dirt to make trees for the jungle.


Bean found a big rock, some flowers, leaves, and bugs for the dinosaurs to eat...yum! ;-)

It's turned into a peaceful little place for her to play and story tell, and has got me thinking about some more small worlds we could create outside for summer...

Happy Playing! 

Tuesday, September 24, 2013

Nursery Rhyme Puppet Show

I cannot begin to tell you just how much we have played with this simple puppet show over the last couple of months. It was something I came up with for Bean one winters day when we were stuck inside and at a bit of a loose end! Bean LOVES anything involving story telling and imaginary play, so this was a total hit with her. Its a perfect rainy day activity for children 2.5 years and older as they can choose the stories and help make the scenery and puppets as well.


To make this we used:
  • Old cardboard box (thick cardboard)
  • Small sturdy cardboard box
  • Cereal box (or other thin cardboard)
  • Scissors
  • Sticky Tape
  • Small googly eyes
  • Coloured pens
  • A4 coloured paper
  • Lollipop sticks
  • Blue tack


The 'stage' to hold the background scenery was made by cutting a thick price of cardboard from an old box into a rectangle (must be at least A4 size), and then attaching another small box to the back to hold it upright, using a strip of cardboard and sticky tape. 

The backgrounds are simply A4 peices of coloured paper, stuck to the stage with blue tack, and decorated with coloured pen, pastels, and cut out paper to make the scenery for the story. 


The puppets were cut out from thinner cardboard (we used empty cereal boxes) to make the body shapes, decorated with coloured pens and googly eyes, and then stuck to lollipop sticks with sticky tape. Bean was able to help with decorating the backgrounds and puppets, sticky taping things together, and of course chose which stories we would make. 


It's so incredibly simple to do, and you can make as many puppets and as many backgrounds as you like! We ended up making quite a few over a number of days, and even now we will add on a new story from time to time. We started off doing nursery rhymes, Baa Baa Black Sheep pictured above...


...Little Bo Peep...


...Incy Wincy Spider...


...Jack Be Nimble...


...Jack and Jill...


...Little Miss Muffet...


...Hickory Dickory Dock (made using a paper plate, cereal box clock hands, and a split pin to hold them in place and allow them to turn)...


For this one the mouse and cat were made using small and large coloured pom poms glued together using a hot glue gun, with googly eyes and kitchen string for whiskers...


...and then we moved on to some of Bean's favourite movies, above is The Lonely Goatherd from The Sound of Music (As yet unfinished, few more characters to make!)...


...But the one which has been by far Bean's favourite and most used...The Wizard of Oz!

As you can probably see this puppet show has been well loved, and therefore has seen a bit of wear and tear. If I had pre-planned this activity I might have decided to laminate the backgrounds and even the puppet bodies after decorating to make them a bit more durable long term. It would be particularly recommendable if you have multiple children playing or children younger than 2, and i've already thought of re-making this puppet show with the other Little Beans when we start day care and laminating it to be an ongoing resource. 

I really hope you try this one at home!

Happy Playing!

Monday, September 23, 2013

Sea Treasure - Sensory Box

I have to give the credit for this activity in large part to my husband, who accidentally invented the main material used in its making! You're probably wondering "what on earth are those blue things?"...Well, Bean has named them 'Curly Whirlies', and they're actually the debris from when my husband was drilling holes in some big plastic barrels for planting. They're all sprially and some of them are very springy, Bean found them fascinating so I just had to use them in some way!


We haven't done so many sensory activities over the winter, mostly due to the mess factor as we usually do this kind of play outside. But the weather is warming up and it seemed a good opportunity to get stuck back in with a sea themed sensory box! 

This sensory box is one with a twist, as well as being a sensory activity it's also a treasure hunt game. Hidden beneath the curly whirlies are little glass gems shaped in sea themes such as shell, sea horse, star fish, and I included a small pot to gather the treasure in. 


The materials used are as follows:

  • Curly whirlies (you could also use blue aquarium rocks or anything else blue that can get wet)
  • Aquarium plants (borrowed from our under the sea playset)
  • Plastic boats (borrowed from our water table)
  • Plastic anchors (found at op shop)
  • Duplo people
  • Jar or small container
  • Sea gems (found at dollar shop) 
I set this up one night for Bean to play with the following day, and it was very well recieved! I think as much as anything she was just so happy to get back in to sensory play outside, which was a big highlight of last summer. 


She started off with some imaginative story telling using the people in the boats, and was interested to have me explain and demonstrate what the anchors were.


I has already anticipated that she would want to add water to this tub, because I mean...who wouldn't? And of course after a little while she went to get the hose. She enjoyed swirling the water around with the curly whirlies in it, it felt wonderful...and it was then that she discovered the treasures hiding underneath!


Well, needless to say we did a LOT of treasure hunting that day (and the next)! When she was losing interest in finding treasure in the tub, we added the gems to our sand pit and dug for buried treasure in the sand. 

All in all this was a lovely box to play with and a really nice start back into using our outdoor space again :-) Roll on summer! 

Happy Playing! 


Thursday, September 19, 2013

Small World - Cardboard Town

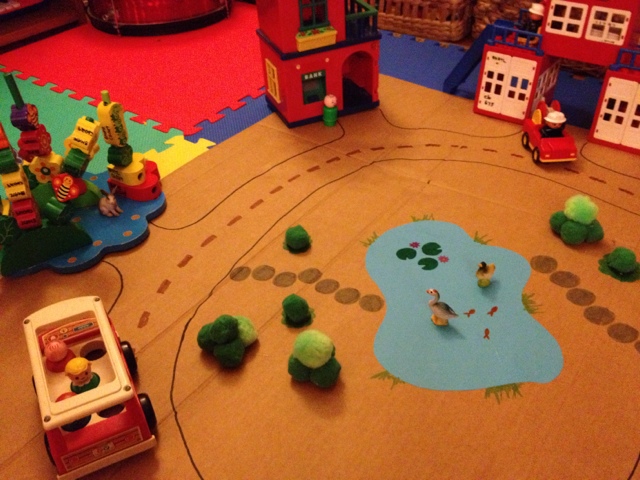
This super easy small world play space was something I put together one evening because we happened to have some big offcuts of cardboard lying around and we had been doing a lot of imaginative play with Lego that week.


All I used to make it was:
  • Big piece of cardboard (big enough so theres room for the child to sit comfortably in the space, but small enough that they can still reach all sides)
  • Blue A4 paper
  • Green Pom Poms
  • Coloured pens
  • Hot glue gun
  • Glue stick
  • Assorted houses, lego, people, cars, animals etc.


First I drew on the road with coloured pens, then I cut out a pond shape from blue paper and used a glue stick to glue it on to the centre. I drew on some Lilly pads and stepping stones leading to the road. Then I used the hot glue gun to glue together some green pom poms to make bushes and glued them to the cardboard.


I arranged the different buildings around the road as places for the people to visit, I included a fire station, Cafe, Shop, house, vegetable garden, and an enchanted forest. Last of all I gathered up various little people and vehicles from around the house, some Lego, some fisher price, as well as some plastic ducks for the pond and rabbit for the enchanted forest. 


And there you have it! A cardboard small world town. 

It's been a great addition to our lounge room play space and Bean is still playing with it two weeks on. A perfect medium to encourage story telling, imaginative play, role play, and songs (such as The Wheels On The Bus). 

Happy Playing!